
All machines are operated by humans, and tattoo machines are no exception. Know the temper of the tools you use and don't let these tools become an obstacle to your work. But many beginners don't know how to use and set up a tattoo gun. The following is a guide for the installation of a tattoo machine, which may be helpful for you who want to be a tattoo artist.
 Step 2. Insert tattoo grip. There are 2 sides of the grip for the tube and the machine's tip. Set these to the preferable length, and tighten the 2 screws on the grip. On average, the needle shouldn't exceed the tip of more than 2 mm and no less than 1 mm.
 Step 3. Take a look at the needles you received with the tattoo gun. You should have a few different types and sizes of needles. Install one of the needles by inserting it through the tube towards the tip. Be careful not to dull a needle while assembling. This could lead to a painful tattoo.
 Step 4. The nipple, also known as a grommet, secures the needle and grip on the machine's base. Place a nipple on the armature bar pin of the tattoo gun. Fasten the needle's round open end onto the nipple.
 Step 5. Once you've assembled the tube, you need to adjust the length of how much the needle is exposed. You can adjust the needle's exposure by adjusting the tube vise. The tube vise is the adjustable screw in between the armature and needle.
 Step 6. Use a "rubber band" to tie the needle bar and the body around the waist about 8mm down from the bottom of the needle barring. The elasticity is moderate to prevent the tattoo needle from coming out during work. Too tight will affect the speed of the tattoo gun.


 Step 3. Test the machine. Once everything is connected and assembled, you’re ready to test the machine. If you are worried about testing the tattoo gun on yourself, just turn everything on and examine it. The needle should vibrate at a consistent speed (without stopping) upon pressing the footswitch.
 If you still have questions after reading the above article, please click the link below to watch our detailed video. Please subscribe to our Youtube channel.
https://www.youtube.com/watch?v=W4mDx4TQ0TM
If you still have questions after reading the above article, please click the link below to watch our detailed video. Please subscribe to our Youtube channel.
https://www.youtube.com/watch?v=W4mDx4TQ0TM
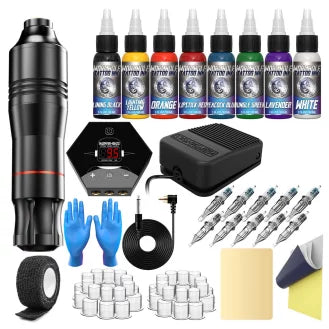
Steps to set up a tattoo gun
Step 1. Tattoo guns need to be treated with the utmost care. Take precautions before handling these machines. Wash your hands with antibacterial soap, then wear latex gloves.
Step 2. Insert tattoo grip. There are 2 sides of the grip for the tube and the machine's tip. Set these to the preferable length, and tighten the 2 screws on the grip. On average, the needle shouldn't exceed the tip of more than 2 mm and no less than 1 mm.
Step 3. Take a look at the needles you received with the tattoo gun. You should have a few different types and sizes of needles. Install one of the needles by inserting it through the tube towards the tip. Be careful not to dull a needle while assembling. This could lead to a painful tattoo.
- For example, RL (round liner), RS (round shader), M1 (magnum 1 layer), M2 (double magnum), RM (round magnum), and F (flat) are all different kinds of needles. The numbers indicate the size and tell how many needles there are.
Step 4. The nipple, also known as a grommet, secures the needle and grip on the machine's base. Place a nipple on the armature bar pin of the tattoo gun. Fasten the needle's round open end onto the nipple.
Step 5. Once you've assembled the tube, you need to adjust the length of how much the needle is exposed. You can adjust the needle's exposure by adjusting the tube vise. The tube vise is the adjustable screw in between the armature and needle.
Step 6. Use a "rubber band" to tie the needle bar and the body around the waist about 8mm down from the bottom of the needle barring. The elasticity is moderate to prevent the tattoo needle from coming out during work. Too tight will affect the speed of the tattoo gun.
How to set a tattoo kit
Step 1. Connect your footswitch. Attach your footswitch to the power supply. The footswitch activates and regulates the power from the power supply to the needle, similar to a sewing peddle
Step 2. Connect the machine to the power supply. There is a clear location at the bottom of the machine for the clip cord to connect the machine to the power supply. There should only be 2 inputs on the power supply itself. Make sure you connect the cables in their proper location.
Step 3. Test the machine. Once everything is connected and assembled, you’re ready to test the machine. If you are worried about testing the tattoo gun on yourself, just turn everything on and examine it. The needle should vibrate at a consistent speed (without stopping) upon pressing the footswitch.
If you still have questions after reading the above article, please click the link below to watch our detailed video. Please subscribe to our Youtube channel.
https://www.youtube.com/watch?v=W4mDx4TQ0TM